 I had the pleasure of watching the new ‘Cooked’ series on Netflix recently. This series, only 4 shows long, is based on Michael Pollan’s book of the same name. In it Pollan explores food and how it has evolved, and evolved us, through the 4 elements of Fire, Earth, Water and Air.
For some reason I was particularly struck by the episode on Air, which explores bread produced through fermentation. Basically, sourdough. I have no idea why this one struck me so much, but I know it did the same to a few other people I talked to so some sort of chord was struck for sure. I know that at least part of my fascination was the fermentation part as I have been making fermented foods like kombucha and sauerkraut for a while now.
Anyway, the next day I set out to figure out how to find a sourdough starter. Honestly, this is a big leap for me, the girl who has mostly baked bricks when trying her hand at bread. I was further discouraged to discover that, as usual, all sources for a starter that I could find online were going to rely on me paying the exchange on the American dollar along with some crazy shipping charges.
Plan B: make my own. Whhhaat??
Something about this plan fuelled my desire even further. If I could encourage my own starter I would have something that was uniquely mine. Southern Alberta Sourdough. So, I set about mixing flour and water into a pancake batter like consistency, ‘feeding’ it twice a day for several days only to end up with something that pretty firmly resembled smelly wallpaper paste. It smelled right but it was supposed to be getting all bubbly and doubling at each feeding after a few days. What I had was bubbly, but not doubly, not even after giving her a name – Stella Sourdough – and talking nicely to her daily.
So, I tried again using the instructions on the incredibly informative King Arthur Flour website. Guess what? After just a few days, I had both bubbly and doubly in my second little jar, now dubbed Sally Sourdough. The competition must have got Stella going too as they both sprang to life at about the same time giving me two starters of differing ages to choose from.
In the meantime I watched dozens of videos, read a bunch of blogs, and tried my hand at two batches of Jim Lahey’s no-knead bread. The no-knead worked pretty well, though I found the flavour just a bit bland and I had to scale back the water on my second try to make the dough remotely workable. The simplicity and my reasonable success at that method kept me going and last night I began prepping my first loaf using a no-knead method with no commercial yeast, just the stronger smelling of my two starters, Stella.
Success!
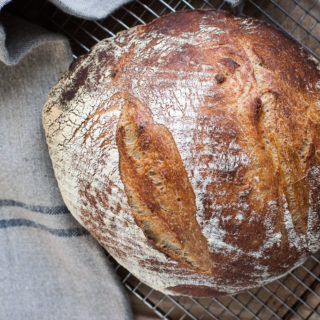
 I am over the top excited about this bread. It had great flavour, a lovely crunchy crust, an airy and perfectly cooked crumb, and man it looks pretty!
 Sourdough, like all fermented foods is a slow food. You begin one day and usually finish the next, leaving the wet sticky dough to rise for at least 12 hours. It takes planning but the time involved in actually making the bread is pretty minimal. Starting at about 7pm last night worked well and had my loaf finished by about 10am this morning. Just in time to make the house smell spectacular at lunch time.
Because this bread is made with a high water content it can be a bit tricky to keep it from sticking to everything but practice makes perfect and this one was nearly perfect. Just a bit of sticking to the floured towel right before going into a hot cast iron dutch oven or combo cooker. Not enough to damage the shape or deflate the dough so I was really pleased.
Next time will be perfect. Maybe.
This is a recipe that offers some leeway, and may require small tweaks for your climate (dryness). It is pretty forgiving though.
Ingredients
- 1 C 5 oz Whole Wheat or Spelt flour
- 2 1/2 C 11 oz all purpose flour
- 1 1/2 tsp salt
- 1 1/2 C un-chlorinated water
- 1/4 C sourdough starter fed
Instructions
-
Dissolve sourdough starter in water, mixing to remove lumpiness as much as possible
-
Mix flours and salt in a medium sized bowl
-
Combine wet and dry ingredients mixing gently and just thoroughly enough to moisten all of the flour
-
Cover bowl with plastic wrap or a shower cap and leave in a warm, draft free spot for 12-18 hours until dough has doubled. It will be very moist.
-
Dump dough onto a floured board, using a dough scraper if you have one (it makes it so much easier).
-
Gently flatten dough out to a rectangle, then grab one end and gently pull out, then fold over about 1/3 of the dough, as though you were folding a letter in thirds.
-
Repeat with the other end and then repeat the process once more from the opposite side so that you have a ball shape.
-
Cover ball with plastic wrap (a little spray oil or flour helps the wrap not to stick), let rest for 15 minutes.
-
Place a tea towel into a medium sized bowl and sift flour over the surface very thoroughly (don't skimp or it will stick!)
-
Cover with plastic wrap and let sit to rise for another 1 hour.
-
Preheat your oven to 500° with a cast iron combo pot or cast iron dutch oven (and lid) inside it. This will take about 30 minutes and your dough should be ready by then. Your pan must be very hot and it needs a lid to keep the moisture in.
-
Remove pot (very carefully!) from oven and invert dough into pot, or bottom of combo cooker. Quickly cut a few 1/4" to 1/2" slices into the top of the bread with a razor blade or sharp serrated knife and place lid on pot.
-
Bake covered for 30 minutes, then carefully remove the pot lid, reduce the heat to 450° and bake an additional 15 minutes.
-
Let cool completely on a rack. Use a serrated knife to cut when ready.
Recipe Notes
Using a traditional banneton or brotform rattan proofing basket will give you a lovely pattern on the top of your bread. It is special, but optional.
