 Sauerkraut is a word that I cannot spell. No matter how many times I write it I have to Google it to be sure I’m spelling it correctly. I’m Polish/Ukrainian for God’s sake! You’d think there would be some sort of genetic propensity for getting it right. I can spell propensity. Crazy.
Anyway, I grew up with Ukrainian grandparents. At least we always called it Ukrainian. Now I’m not so sure. My uncle has recently proclaimed that our family actually hails from something that used to be called the Kingdom of Galicia. How very Disney.
Either way, Ukrainian/polish traditions, language and food were often on the table and I grew up eating my fair share of pierogi with ‘grease’ – my Baba’s name for the butter and onions that were mandatory accompaniments.
Mmmmm, butter and onions.
I tell my boys all the time, if you want someone to think you’re a great cook, just fry up some butter and onions.
My grandparents’ were some of those intrepid settlers that took the bait that the government offered and came to the prairies to clear land in exchange for ownership and a new life in Canada. They worked hard. They lived in a grass home. Yes, a home made of sod. They raised chickens and they farmed and they gardened. My grandparents, and likely yours too, ‘put up’ whatever they could preserve to get them through the Canadian winters.
Homemade sauerkraut was one of those preserved foods. Many, many prairie families had crocks of kraut fermenting in their cold storage along with pickled beets, carrots, cukes and beans.
Last year I decided that I should give making my own sauerkraut a try. I had been reading about the benefits of lacto-fermented foods and kraut is one of the easiest places to start. Its even easier than kombucha, which requires a SCOBY to get you going, and by using natural lacto-fermentation you not only preserve the cabbage but you increase it’s bio-availabilty. Your body can actually extract more nutrients than it can from fresh. How awesome is that?
Nothing is easier, though you do have to take care. All you need for sauerkraut is cabbage and salt, and some care and attention. The results are so much better than the vinegary store bought stuff. It is pleasantly salty but not vinegary and it is still crunchy because it is not cooked.
This year I threw a few cabbage plants into my garden on a whim. I have never tried growing cabbage but the idea of using home grown cabbage that was super fresh for my kraut was highly appealing, so in they went. The fresher the cabbage, the better the kraut.
I’ve been watching them carefully. On the same impulse I also purchased a few little purple cauliflower plants. Unfortunately, they bolted when we were away on vacation and ended up in the compost. The little cabbages though have been slowly forming nice round firm heads. My nephews, who were over to pick some raspberries and saskatoons, were checking out the cabbages just the other day, so I was surprised to go into the garden this morning to find the largest one cracking open!
Up it came, on the spot. I wanted to see if it was bolting too so it was into the kitchen and out with the chef’s knife. I’m not entirely sure why it cracked. It didn’t appear to be pushing a flower stalk through. Maybe it was watered at the wrong time? I’m not sure.
No matter, I now had a cabbage to deal with. Lucky for me as I am down to about 1/2 cup of my fall sauerkraut.
 The cabbage was finely sliced into a large stainless bowl and weighed. I had about 3 pounds from this cabbage. I added 2 Tbsp sea salt and left it for about 10 minutes.
 After about 10 minutes you need to knead your cabbage to begin to break down the fibres and bring out the natural juices. It will reduce in size and you’ll end up with a bunch of liquid at the bottom of the bowl. Whatever you do, don’t drain the liquid. Natural fermentation is an anaerobic process and you need that liquid to keep the air away from the cabbage.
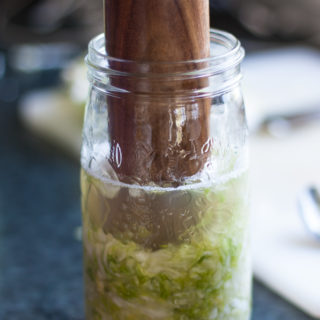
 Then the cabbage is packed very tightly into sterile jars and pounded down. A kraut pounder (yes there really is such a thing) is useful but I don’t have one. Luckily a recent trip to an Indian market had me walk out with this beautiful wooden pounder. I have no idea what it might be used for but it wouldn’t surprise me if it is also for some sort of pickle. I was smitten. It is pretty and I knew exactly what I was going to use it for. It also cost me only about $8. Start the car!
Once the jars are very firmly packed I fit mine with an airlock lid (from beer making I think) that Steve hacked for me. This rig helps to keep the air out but allows gasses produced to escape. There are several ways to do this including just keeping the cabbage submerged under the brine by using a sterilized rock, water in a ziploc bag, glass weights or a small plate (if you are using a larger crock). There are also specific crocks made just for this purpose. Cool but expensive.
It is important to keep the air out as it is possible to spoil the cabbage. Not so great. It’s also possible to have the jars overflow or even explode as the cabbage begins to ferment and create gasses. The trick is to keep the air out but let the gasses out too.
There are some nice little pre made airlock lids for mason jars that look pretty much like my homemade version but I have yet to find someone in Canada that sells them and the shipping and the US dollar are a deterrent for me. My homemade lids on a simple mason jar are not super pretty but they have been working for many batches now so I’m sticking with it. If you can afford it, or if you are handy, I highly recommend an airlock lid, it makes things so much easier and makes a prettier end product by keeping the maximum amount of air out.
My 3lbs of cabbage turned out two jars of cabbage, a large and a medium mason jar. Now I just need to be patient and let the fermentation begin. I like to leave my sauerkraut for several weeks before refrigerating it as I like it to be nice and tart. After all, I’m a Galician!
Ingredients
- 1 large cabbage to yield about 2-3 lbs shredded
- 2 Tbsp sea salt
- 2 or so wide mouth mason jars to fit your volume of cabbage
Extra brine
- 1/2 C boiling water
- 1/2 tbsp sea salt
- Dissolve salt in water cool and use to top up if necessary
Instructions
-
Sterilize two large mason jars using the boiling water or oven method.
-
Core and slice cabbage into thin ribbons. You can use a chef's knife or a food processor. Place cabbage into a large bowl.
-
Sprinkle salt over cabbage and mix with hands to distribute evenly.
-
Leave to sit for about 10 minutes, then massage cabbage vigorously to begin to break down the fibres and release the natural juices. Do not discard the liquid!
-
Once the cabbage has softened and reduced in volume, spoon it into your jars in layers. It should almost look a bit like you've cooked it.
-
Pack the cabbage down tightly, pressing on each layer with a meat mallet, kraut pounder or the back of a spoon. You want to remove as much air as possible, while extracting the natural juices even further. Be aware of overflow from the displacement of the pounder - do this in a bowl so you can save the liquid and pour it over the top once the pounder has been removed and its volume displaced.
-
Fill to about 3/4" -1" from the top of the jar
-
Top the cabbage with a clean whole leaf to prevent the shreds from floating to the top, then place a clean rock, fermentation weight or a baggie full of water into the top of the jar, or fit it with an airlock lid. You want to keep the cabbage under the water at all times and may have to top the jar up with a little brine at some point during your fermentation.
-
Place the lid back on the jar. If not using an airlock device you may need to burp your jars every day for at least the first week to allow any gasses to release.
-
Leave at room temperature for several days or up to a month. Keep an eye on it and discard it if it becomes foul smelling. It may increase a little or quite a lot in volume at the beginning, so place it onto a few paper towels or a large plate to catch any liquid that rises up and over the jar. As it ferments you may find that the volume of liquid then goes down, top up with a bit of extra brine if needed to keep cabbage submerged.
-
Refrigerate when it is as tart as you like it. It is naturally preserved and will keep for months in the fridge.
Recipe Notes
Slight darkening of the cabbage at the top, or even a slight scum (as long as it doesn't smell bad) can simply be removed before consuming. It is a natural part of the process


